 |
 |
Satish Lele lelepiping@gmail.com |
View this page as YouTube Video Presentation
- ISO vs ORTHOGRAPHIC
Simplicity (Only one pipe line is drawn in one A3 size paper).
In a orthographic view it is not a problem if the pipe runs in one plane, but when a pipe runs in two or three planes (north to south, then down and then to the west, etc.) an orthographic view can be unclear.
More number of drawings needed in orthographic views than ISO to represent the same piping system.
Sectional views are required for clarity of pipe routing
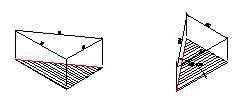
Unlike orthographic drawings, piping isometric drawings allow the pipe line to be drawn in a manner by which the length, width and depth are shown in a single view. Isometrics are usually drawn from information found on a plan and sectional elevation views. The symbols that represent fittings, Valves and flanges are modified to adapt to the isometric grid.
The Iso, as isometric is commonly referred, is oriented on the grid relative to the north arrow found on plan drawings. Because isos are not drawn to scale, accurate dimensions are required to specify exact lengths of piping runs.
Pipe lengths are determined through calculations using coordinates and elevations. Vertical lengths of pipe are calculated using center line elevations of pipe lines, while horizontal lengths are calculated using north-south and east-west coordinates.
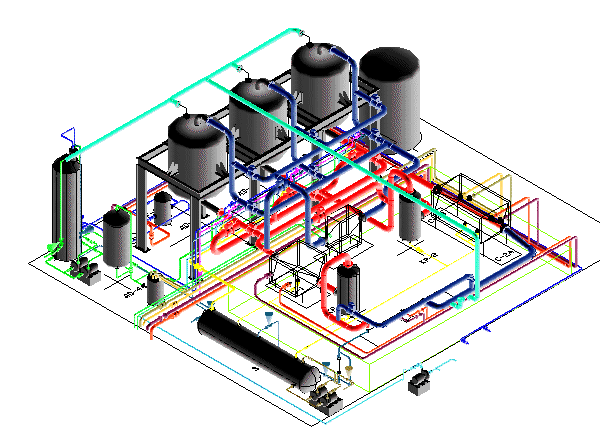
Piping isometrics are generally produced from orthographic drawings and are important pieces of information to engineers. In very complex or large piping systems, piping isometrics are essential to the design and manufacturing phases of a project.
Piping isometrics are often used by designers prior to a stress analysis and are also used by draftsmen to produce shop fabrication spool drawings. Isometrics are the most important drawings for installation contractors during the field portion of the project.
- What is an Isometric Drawing?
A piping isometric drawing is a 2D drawing in which piping is represented like a 3D drawing. In inexpensive CAD program like BricksCAD, ProgeCAD, IntelliCAD, Draftsight, CADLogic, or ZWCAD drawing, only x and y co-ordinates are used to draw entire drawing.
Isometric Layout: Isometric lines can be in vertical direction and two other directions at 30° from horizontal. All directions of the pipe may match the three isometric axis lines.
Isometric is popular within the process piping industry because Isometric can be drawn and read with ease and shows the piping in a realistic view.
Isometric is used along with plans and sectional elevations but typically Isometric is used to supplement the plan drawings.
Isometrics are used as fabrication & shop drawings for fabrication of run of a pipe.
Isometrics also provide a drafter with the ability to calculate angular offsets in the pipe run.
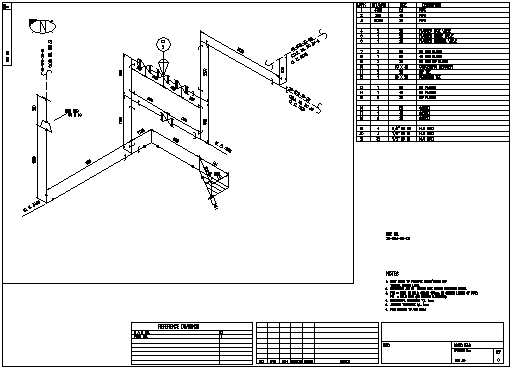
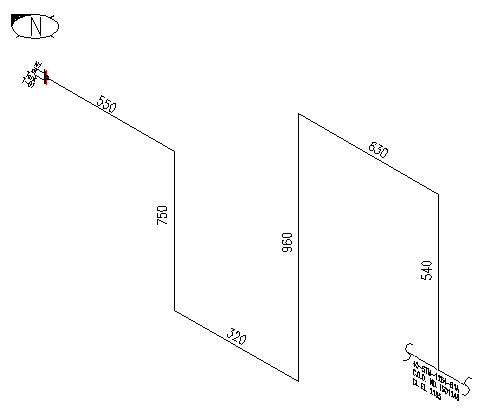
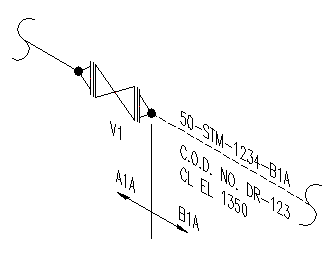
Isometrics are drawn on b-size paper (11” x 17”) in imperial units and on A3 size paper (297 mm x 210 mm) in metric units. Drawing number and revision number is indicated in box on top left corner. Drawing number and revision number is also shown in title box. The table at bottom indicates the numbers of relevant P&ID drawing and General Arrangement (GA) drawing. The bill of material appears in top right corner. A table is also provided for indicating revisions made. The rectangular area on left is reserved for Isometric drawing.
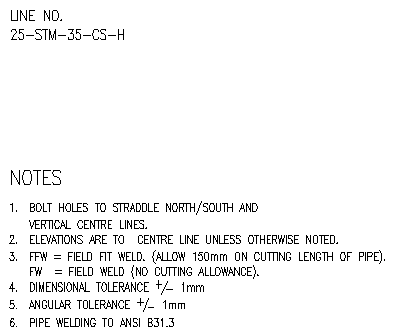
The line number is shown in space in right column. General notes appear below line number.
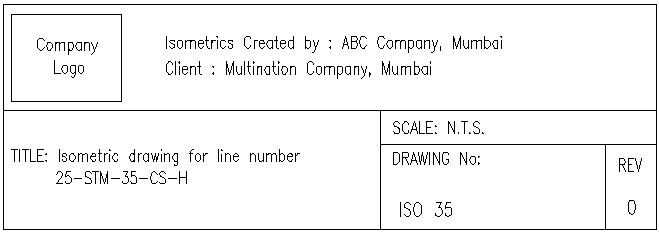
Every company has its own template, showing company's name, address, logo etc.,
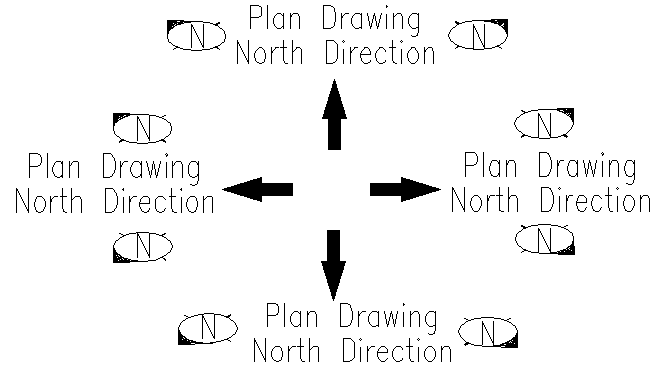
Arrow showing north direction is shown in top left corner. A north arrow shows North direction with respect to North direction in GA drawing. The direction orientation depends on North Direction of Plan drawing. This helps in reading the Plan and Isometric drawings together. Preparing a sketch to draft isometric drawing: View the model in the direction of north of model and start sketching pipe lines.
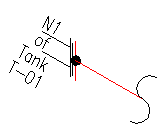
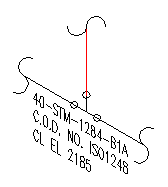
The line may start from nozzle of an equipment, such as a vessel or a pump. Indicate nozzle number and equipment tag near nozzle. In some cases, pipe line may originate from some other line. Indicate line number of that pipe line, its center line elevation, and isometric drawing number of that pipe line.
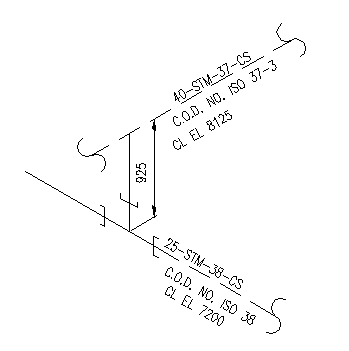
Branches of the pipe run or continuations are placed on other drawings, typically shown as short portion of dashed line on main pipe run. Dashed lines show pipe continuation. Reference drawing information is given for continuation.
One run of pipe is drawn in one isometric drawing. If one pipe run can not be accommodated in one drawing, pipe run is continued in next drawing. Two identical pipe lines (Two similar suction lines of two pumps) are generally drawn in one isometric drawing.
Isometrics are rarely drawn to scale. A longer pipe, (on left), may be shown shorter, if pipe line does not have any fittings in it. However, a small length pipe may be shown with longer length, to show all the fittings in that portion of line. However, pipe lengths should be shown accurately. In this case, Isometric is limited by space, so sometimes proportion may be sacrificed but it is important that the written dimensions are accurate. If the pipe is vertical, the lettering should be written vertically and at 30° obliquing angle. Text in dimension in vertical lines, should always be parallel with dimension line.
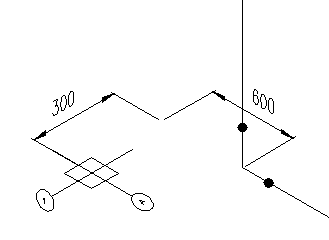
Direction & Location: Location and direction helps to orient the isometric drawing properly. Structural reference points that provide location of column along the grid can be shown on isometric. Dimensions must always be given to points of reference, such as structures, center line of existing equipment etc. Co-ordinates should also be shown on the isometric drawing.
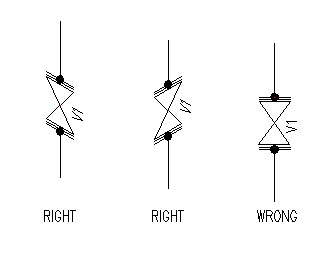
When orienting fittings or valves, it is important to draw the fittings or valves, so that they are inclined to the last direction change or branch in the pipe. Fittings or valves are drawn the same shape as they appear on the plan & elevation drawings but they are drawn at an isometric angle.
Looking at the orientation of model, go on sketching the line from one end to other. To get the length of each cut pipe, get distance between two ends of 3D pipe. To get the length of pipe from center line of fitting to center line of anathor fitting get distance between insertion points of two fittings.
If you are sketching with the help of plan drawings, use the difference in elevations of two adjacent lines as length of the vertical line. For horizontal lines, use the distance between two pipes, to get length of the pipe. Mark length of each pipeline on each line in the sketch of isometric drawing.
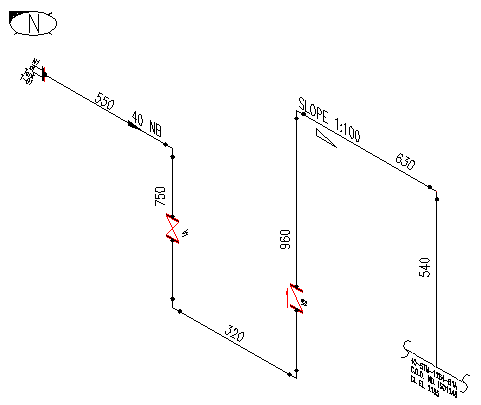
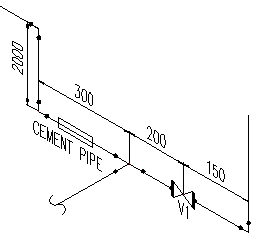
Mark elbows on the drawing. Show location of valves, with type of flange. The location of the valve is shown by dimension of the center of valve. Show direction of flow, with pipe NB. If a horizontal pipe line has a slope, indicate slope on that pipe line.

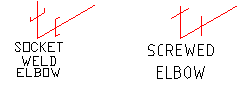
Use branching table to select end connection of Elbows. Normally, Elbows with NB less than 50 are socket weld or secrewed and Elbows with NB greater than 40 have butt weld ends. Elbows can be drawn in a couple of ways.
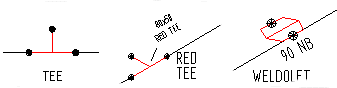
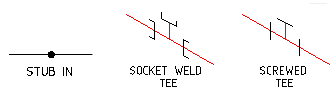
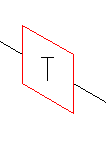
Add any branch to the drawing, like, Tee, Reducing Tee, Weldolet, Socolet, elbolet etc.

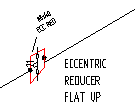
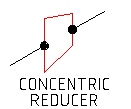
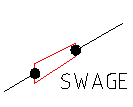
If the line is reduced in its path, add a reducer. Reducer can be concentric, eccentric with flat top or eccentric with flat bottom. Concentric reducer is generally used in a vertical line or line where flow pattern should not get disturbed, as in case of line of Control Valve. Eccentric reducer with flat top is generally used in suction line of a pump. Eccentric reducer with flat bottom is generally used in horizontal lines. Eccentric reducer maintains the bottom level of pipe line after reduction in size. Swage is used to connect a pipe with butt weld end to a pipe with a socket weld end.


If there is any Coupling, Union, Hose or trap in a pipe line, draw it on line.
Spec change is generally implemented at isolating valve or at flange of different pressure rating. The spec of valve depends on Fluid in this and next pipe line or pressure ratings of this and next pipe line. Demarcation is shown between new and existing pipe spec and reference line number, drawing number and center line elevation is indicated for new drawing. Usually a note indicates the name or specification of the branch line.
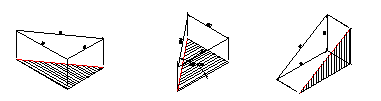
Offsets: To indicate an offset, hatches on isometric drawings are applied, to indicate that a pipe runs at a certain angle and in which direction the pipe runs. Offset is shown with a fitting (typically a 45° elbow).
Horizontal Offset: If a line turns at 30° to 45° in horizontal plane, you draw a pipe with a 45° elbow. But pipe line would look like a vertical line. To avoid confusion, the offset is drawn 22˝° horizontal offset to give the illusion of the angle.

Vertical Offset: If a line turns at 30° to 45° in vertical plane, you draw a pipe with a 45° elbow. In this case, too, to avoid confusion, the offset is drawn 22˝° vertical offset to give the illusion of the angle.
Dimensioning: Dimensions should preferably appear above if the pipe line is horizontal and on left hand side, if the pipe line is vertical. Best way to dimension a pipe line is between its center line at the intersection points. Try to keep all dimensions outside the piping view when possible. Dimensions should always be shown between points in the same plane. One of the extension lines of the dimension should be a center line of the run of pipe.
Single source for all piping documents: The piping model provides a single central source from which all project personnel can extract and manipulate data. In effect, this is an official master document that is always up to current revision level. Drawings for any purpose are based upon the model’s geometry. Three-dimensional geometry: The piping model is a true three-dimensional representation of the piping system. The actual coordinates of every point on the design are available for use in dimensioning individual drawings, checking clearance between modeled objects, making special reports, extracting geometry for pipe stress analysis, and removing hidden lines. Standard design technique: The model is conducive to proper drafting and design techniques because it promotes a specific method of model creation. In the case of a 3D piping model, certain steps must be followed, thereby promoting a standard technique of model design. Reduced drafting repetition: Some of the commands used for plant design eliminate many time-consuming steps that arise in drafting an isometric. These include creating fitting symbols, calculating dimensions, dimensioning skew pipes, and extracting a bill of materials. External software interface: The database of a piping model can be output in a neutral format that is used to interface to external programs. An example of an external program is one for stress analysis. Project linkage: Data from a piping model can be linked with data from related models in a common project. This allows reporting across adjacent models and data consistency checks between pipelines in different types of drawings such as arrangements and P&IDs.
When you create an isometric sketch from a model, use of the following features will make the best use of the system:
To create an isometric drawing, first create a true three-dimensional piping model. Although you can use explicit modeling as a conventional drafting system, it is recommended that you use it as an intelligent 3D modeling aid.
Making an isometric involves the following steps:
1. Establishing model defaults: The first step is to establish default parameters for the model. The values set here have a great effect on the appearance of both the model and the isometric and the ease with which they are made. The following is a list of some of the more important items and the commands used to set their values:
• Modeling units.
• Drawing appearance.
• View orientation.
• Construction plane origin.
• Text width and font.
• Component insertion parameters.
• Dimensioning parameters.
2. Inserting non-piping items: As a part of your piping model, you may want to insert items at the origin and destinations of pipe lines such as nozzles on vessels or heat exchangers, and other pieces of major equipment. Before inserting the piping, fit the model in the active view window. End points of the piping main line are the likely locations. Then position these points using the ZOOM VIEW or DYNAMIC VIEW commands. Maintain the final orientation with SET VIEW.
3. Inserting piping items: Menu options provide the required data for automatic component selection. Begin routing at the upstream terminus of the main line and route from vertex to vertex in the flow direction until the line is terminated. Going from beginning to end, insert all fittings by inserting these through menu. After completing the main line, route branches off the main line in the same way.
4. Freezing model geometry: After checking the piping layout and the fitting locations, freeze the model geometry.
5. Setting up the isometric: Create a sketch on paper, looking at the model. Measure dimensions on model and note down in sketch. Using the isometric program, create isometric.
6. Dimensioning the isometric: Using different dimension options, write all dimensions.
7. Editing the isometric: Changing the layer scheme, rotating item number labels, translating weld numbers, unblanking pipe segments, and editing dimensions.
8. Inserting a bill of materials: Using automatic bill of material option you can create a table. The values in the table need to be adopted as per sketch. Lengths of pipe, size of reducers and number and lengths of bolts need to be changed using options in BOM menu.
9. Plotting the drawing: You can plot the isometric using standard plot command.
 Trial programs are full scale programs without option to insert Valves.
 Isometric Program
