 |
 |
Satish Lele lelepiping@gmail.com |
View this page as YouTube Video Presentation
PIPING ISOMETRICS PROGRAM can run on Personal Computers, on a Pentium system with 32 MB RAM. PROGRAM for PIPING ISOMETRIC DRAWINGS supports screen, buttons and icon menus, as well as, dialogue boxes. The program is specifically written for any inexpensive CAD program like BricksCAD Lite, ProgeCAD, IntelliCAD, Draftsight, CADLogic program.
The iso_trial.zip file contains all program files. There is no setup.exe file as in other packages. To run program, unzip iso_trial.zip and copy files in a folder, say iso. To set up program, while running inexpensive CAD program like BricksCAD Lite, ProgeCAD, IntelliCAD, Draftsight, CADLogic program (it can not run in AutoCAD LT), at command prompt type _options (or _preferences) and press <enter>. It will open a dialog box. Open Files tab (if not open) -> + of Support File Search Path -> Add -> Browse -> Select the folder, select apply and close.
To set up menu for the program, while running in any CAD program, at command prompt type menuload and press <enter>. Menu Configuration Dialog box will open. Click on Menu Groups tab. Next to text box File Name, click on browse. Click on down arrow of Files of type box, and select Menu Template (*.mnu). Select either iso_mm or iso_inch, and click on open, Click on Load. For Continue loading MNU file?, click yes. Menu will be compiled and appear in menu groups. Click on Menu Bar Tab, and select either iso_mm or iso_inch. In left side Menu Box, iso menu will appear. In Menu Bar box, click on windows, and click Insert to load iso menu. Start using Pull Down Menu.
In BricksCAD Lite, installation is bit different. You can add menu with CUSTOMIZE command and You can load lisp file by APPLOAD command.
OR
Once it is set up, open trial.dwg and, at command prompt type (load "iso") and press <enter> or use APPLOAD command. Iso package will be loaded, and start using iso program, by typing iso and press <enter>.
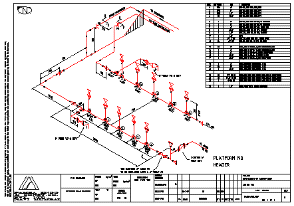
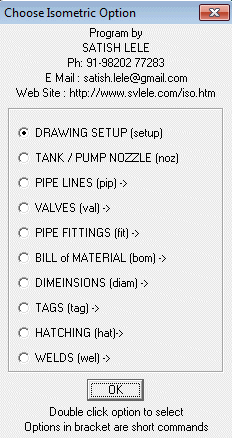
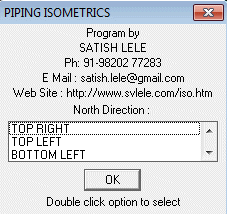
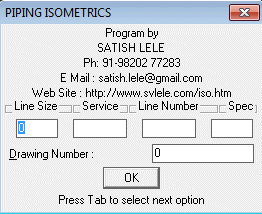
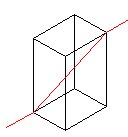
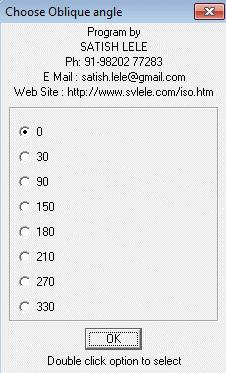
SETUP: To draw an Isometric Drawing, first run this option from ISO button menu and select North Direction. A drawing with all default values properly set, is set-up automatically. The size of the drawing is 420 mm wide and 297 mm high for Metric Units and 17" wide and 11" high for Foot-Inch Units. In the dialog box that appears, enter drawing number, and line number. Then change P&I D Number as well as GAD Number using ddedit. Whenever program ask for angle of a pipe line, angle is selected in degrees, as per CAD Standard angles.(0 degree for East, 90 degree for North, 180 degrees for West, 270 or -90 for South and any other angle in between).
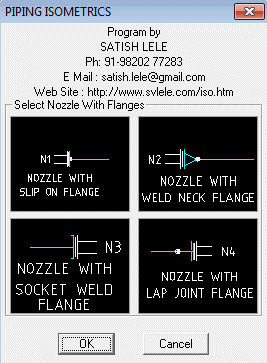
NOZZLE: Draw a vessel nozzle with four types of flanges attached to nozzle, at any angle, using this option. When you click on this a dialogue box will open, showing the type of flange attached to nozzle. You can have Slip On, Weld Neck, Socket Weld or Lap Joint Flange. Select the proper flange connection. Dialogue Box will close and you are asked to select point location of nozzle on the pipeline and then through a Dialog Box, you can define nozzle side direction angle in degrees. Assign nozzle number or pump number to the nozzle. PROGRAM for PIPING ISOMETRIC DRAWINGS will automatically draw a nozzle with flange and gasket and write nozzle or pump number.
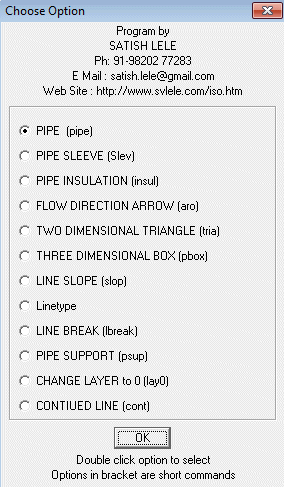
PIPELINES: When you click on this, this offers twelve options.
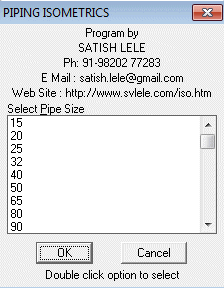
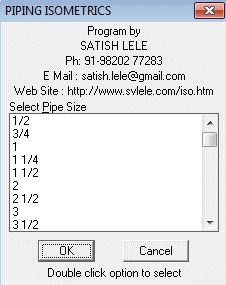
Pipe : You can draw all pipelines with diameter from 15 mm NB to 3600 mm NB, or from 1/2" to 144", using this option. PROGRAM for PIPING ISOMETRIC DRAWINGS will set layer to linesize_1 and colour of layer to cyan. If pipe size in not defined, a dialog box will open and ask you to select size.
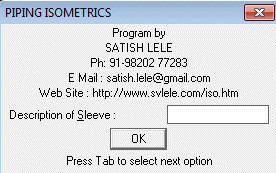  | Sleeve : You can draw a sleeve through a pipe passes. Program asks to select the pipe line, and then you can enter the description of the sleeve in dialog box. PROGRAM for PIPING ISOMETRIC DRAWINGS draws the sleeve, and writes description on top of pipe line. |
  | Insulation : You can draw insulation symbol on a pipe line. Program asks to select the pipe line, and then you can enter the description of Insulation in the dialog box. Insulation symbol will be put on the line, and description is written on top of pipe line. |
Arrow : To show direction of flow of a pipe line, you can use this option. Pick start point of arrow head on the pipe line and point on the line towards tail of arrow. PROGRAM for PIPING ISOMETRIC DRAWINGS automatically draws the arrow, and writes pipe NB above pipe line. |
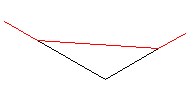 | Triangle : If a line is running at an angle other than North / South or East / West, or at an angle in horizontal or vertical plane, you can use this option to draw the other two sides of triangle (These lins are drawn un layer 0). Program draws pipeline joining two end points of triangle and you can continue pipe option and draw the pipe line further. These lines can be used for hatching the triangle. |
 | Box : If a line is running at an angle other than North / South or East / West, as well as at an angle in horizontal or vertical plane, you can use this option to draw the lower two sides as triangle option and the program then asks to select vertical distance and draws a box (The box is drawn un layer 0). A pipeline joining two end points of box is drawn and you can continue pipe option and draw the pipe line further. These lines can be used for dimensioning the box. |
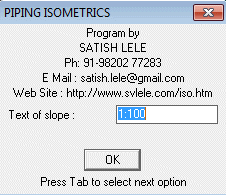  | Slope : To write slope of a line on a pipeline, you can use this option. Program asks us to select a line, then a point in the direction of the slope, text to be written on line (eg. 1:100) and after you select the location of the text, program writes slope automatically at that location, while drawing a triangle showing slope. |
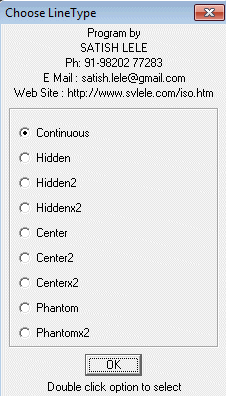 | Linetype : You can change linetype of a line to continuous, hidden, hidden2, hiddenx2, center, center2, centerx2, phantom and phantom2. |
 | Line Break : You can put a line break at the end or anywhere in the pipe line. you can pick up insertion point and line break is inserted. |
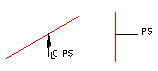 | Pipe Support : Program asks to select pipe line. If line is inclined, PROGRAM for PIPING ISOMETRIC DRAWINGS marks a support at the point selected, an arrow pointing upwards, and writes Cl of support. If line is vertical, PROGRAM for PIPING ISOMETRIC DRAWINGS draws a horizontal line from that point and writes PS. |
Change Layer to 0 : If the particular entity is not part of the the line, you can put that entity to layer zero and change its linetype to hidden, using this option. Program asks to select a number of entities, and then changes the same. |

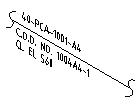
Continue : If a pipe line is not included in this drawing, that pipe line can be drawn with this. Line is drawn dotted. The program asks you to select first point, then second point. Through a dialog box, you can enter line number which appears above the line. You can also enter Drawing number in which that line is drawn. Detail is written below the line as C.O.D. and line number. PROGRAM for PIPING ISOMETRIC DRAWINGS writes Centerline Elevation, below it.
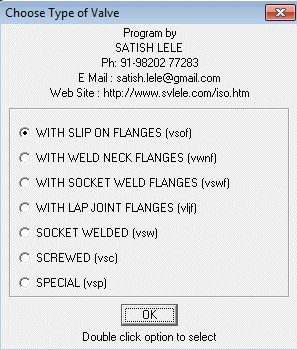
VALVES: When you click on this option, this offers six options, which in-turn offers a number of options with the help of Dialogue Boxes.
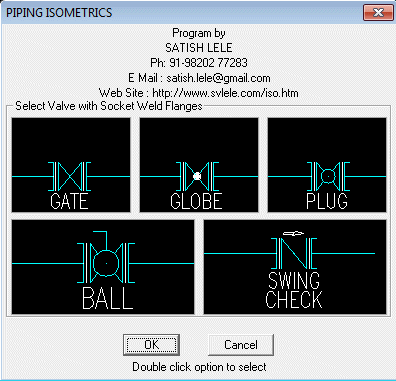
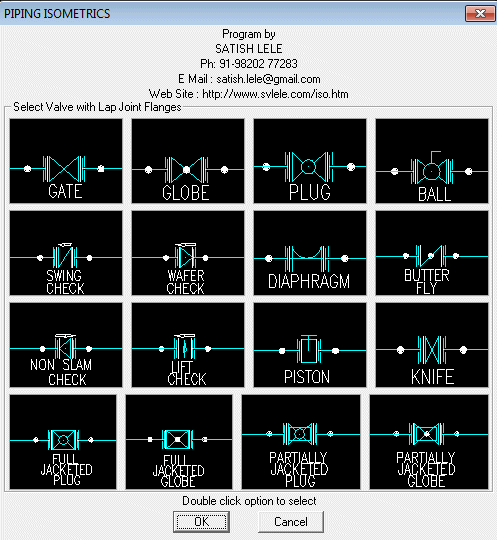
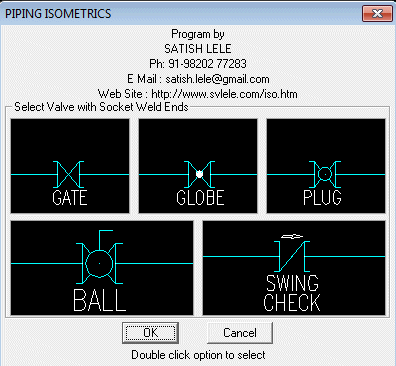
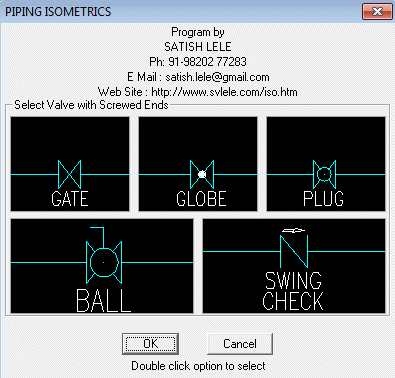
 | Once you insert a valve a dialog box will appear. You can fill in valve number as per (P & ID). If you do not want to assign any number, select cancel. It will still ask for number in command line. Press <Escape> to exit. |
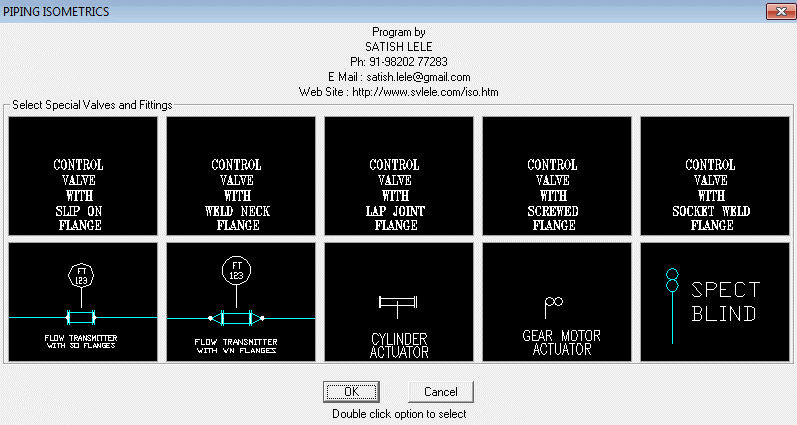
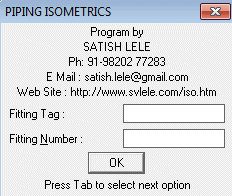
SPECIAL FITTINGS: When we click on this, this offers ten options through icon menu. If you select control valves or flow transmitters, a tag will be drawn. For that select point where tag will be drawn. It will show a dialog box. Fill in details. It will be written in circle.
 |
|
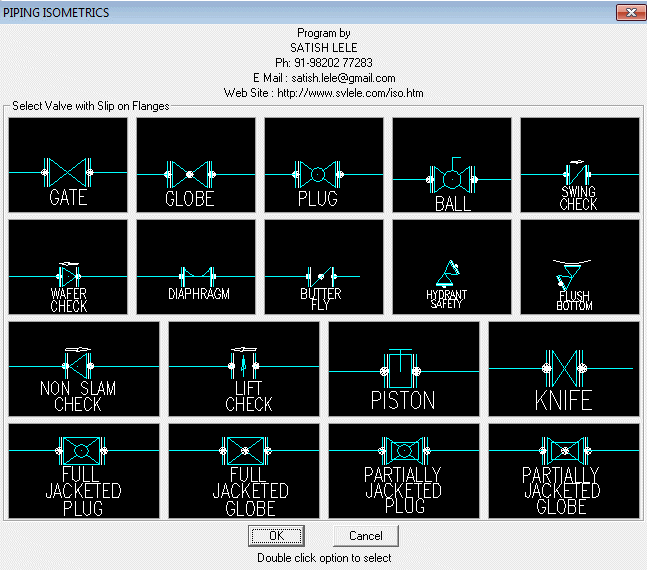
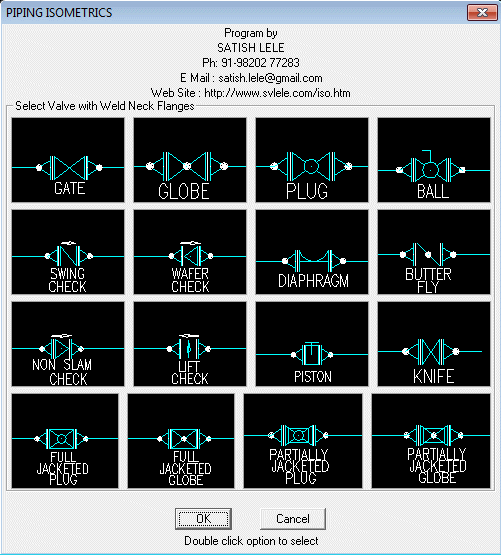
Method to Insert a Valve: First you select the option by clicking the option. Dialogue Box appears on screen showing the type of drawing PROGRAM for PIPING ISOMETRIC DRAWINGS will draw. Select the one required, by double-clicking. Click on the pipeline and in case of Gate, Globe, Plug, Ball, Diaphragm and Butterfly Valves, valve will be inserted in the line. For Check and Wafer Check valve, you pick up from dialog box the angle of pipeline in the direction of flow. The valve is drawn in the line in proper direction. You can enter valve number through a dialog box, which will be written near valve. For Hydrant valve (or PSV), double click on the end point of pipeline (osnap end is already set), pick-up from dialog box the angle of pipeline, and again pick-up from dialog box, angle of outlet of valve in the direction of flow. The Hydrant valve (or PSV) is drawn in the line. Program automatically puts these valves on layer 2, assign color of layer as cyan and also draws flanges and gaskets in the drawing.
 | FITTINGS: When we click on this, this offers eleven options. |
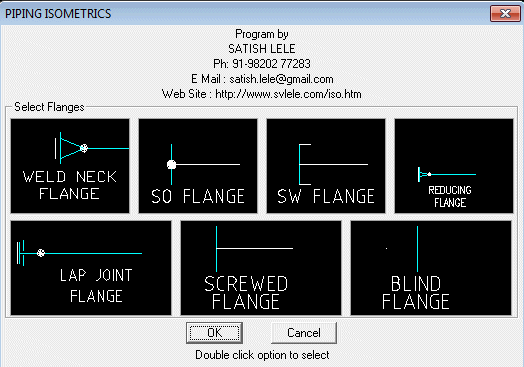
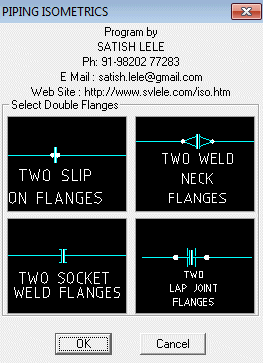
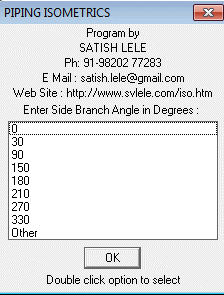
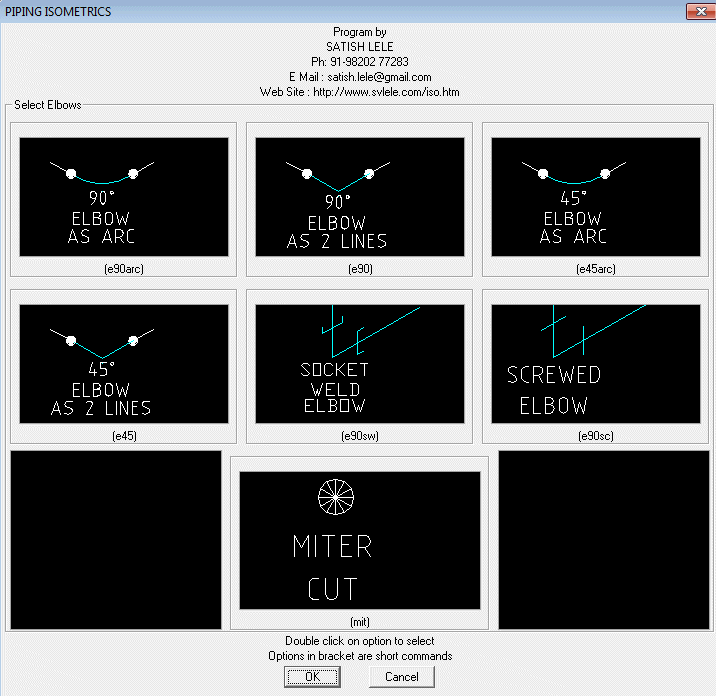
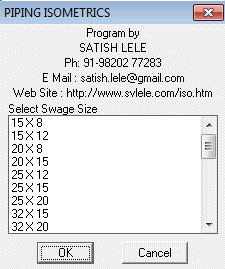
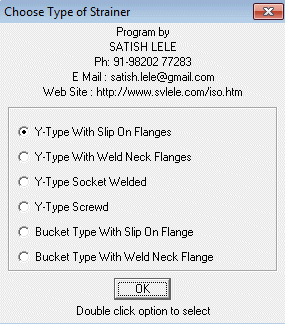
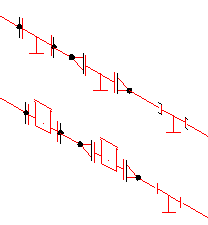
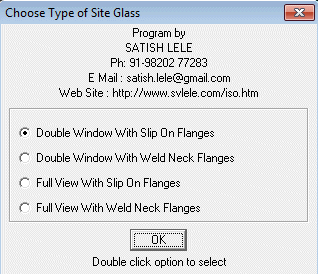
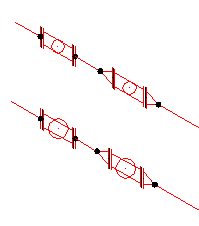
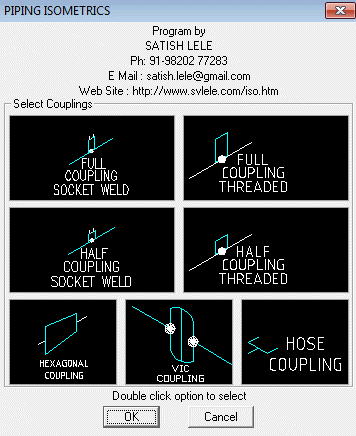
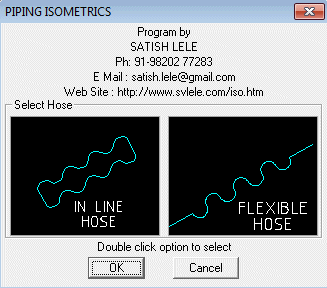
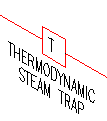
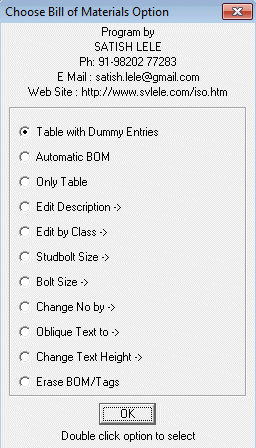
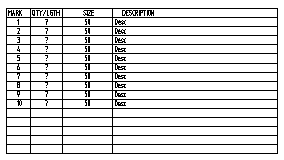
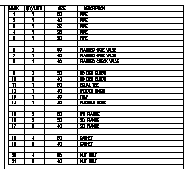
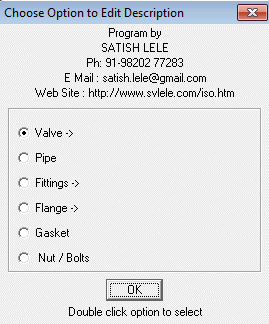
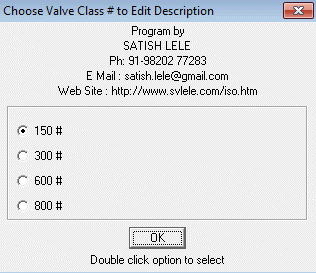
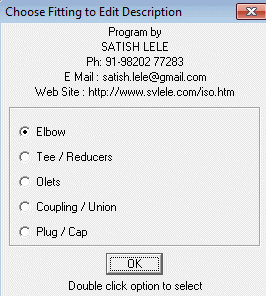
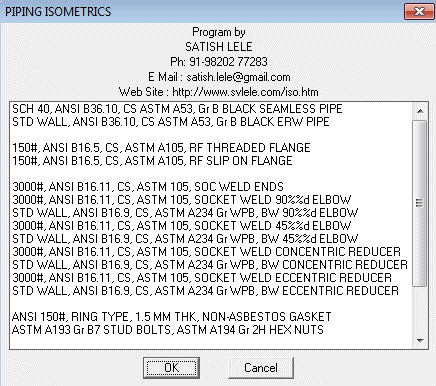
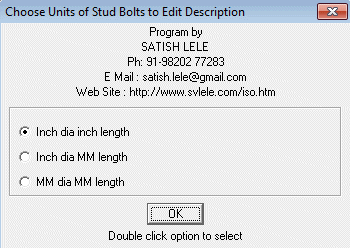
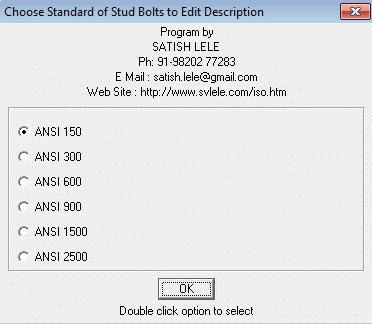
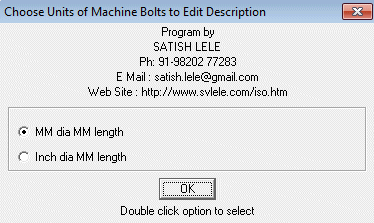
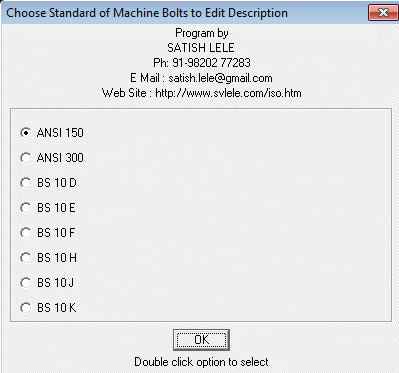
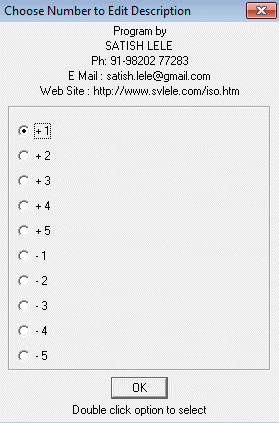
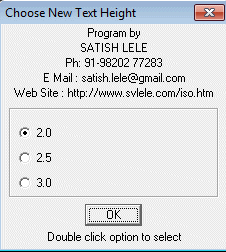
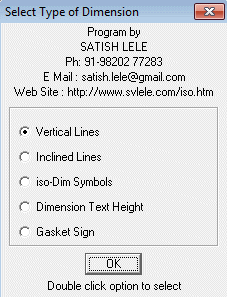
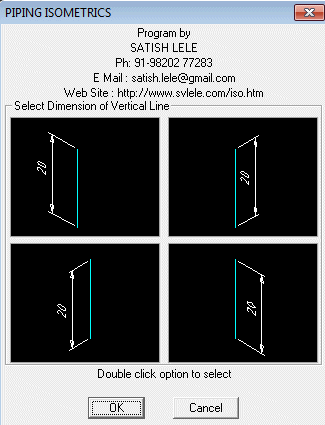
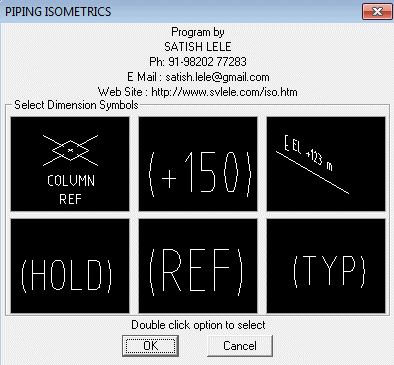
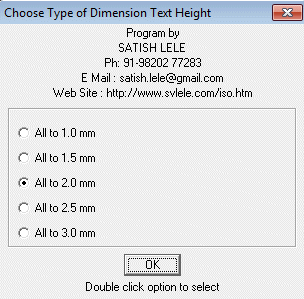
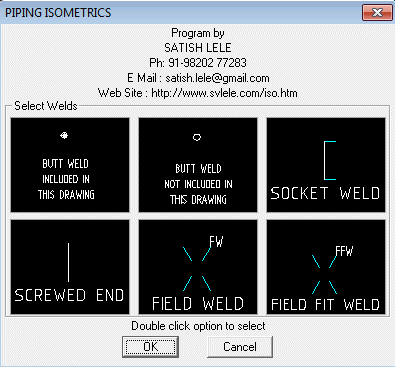
Single Flange : This has seven options. Weld-neck, slip-on, socket-weld, lap-joint, screwed, blind and reducing flanges. You can select the option by clicking in menu. A Dialogue box appears on screen showing the type of drawing, PROGRAM for PIPING ISOMETRIC DRAWINGS will draw. Select the one required, by double-clicking, and select the pipe line (osnap nearest is already set), and from dialog box we pick the gasket side angle of pipe line. The flange is inserted in the pipe line. PROGRAM for PIPING ISOMETRIC DRAWINGS asks whether gasket is required. If you say yes, gasket is put in line near the flange, in the direction of flow. Double Flanges : This has four options, weld-neck, slip-on, socket-weld, and lap-joint. Select the option by clicking flanges. A dialogue box appears on screen showing the type of drawing PROGRAM for PIPING ISOMETRIC DRAWINGS will draw. Select the one required, by double-clicking and select the pipe line (osnap nearest is already set), and the double flanges are inserted in the pipe line. PROGRAM for PIPING ISOMETRIC DRAWINGS puts gasket in line between two flange. Branch Connection : This has nine options, equal tee, reducing tee, weldolet, threadolet, socolet, nippolet, stub-in, socket weld tee and screwed tee. Select the option by clicking branch connection. A Dialogue box appears on screen showing the type of drawing PROGRAM for PIPING ISOMETRIC DRAWINGS will draw. Select the one required, by double-clicking and select the pipe line. You have to then indicate the angle of side branch, through dialog box. The branch connection is inserted in the line. You can then continue drawing a pipeline. In case of reducing tee, weldolet, socolet, nipolet, threadolet and stub-in you are asked to select the size of branch pipe through dialogue box. Only valid sizes are offered for selection of reducing tees and you have to pick a point where the size is written. For stub-in, select the pipe line (osnap nearest already set). A weld is put on pipe, and you can draw the branching line. Elbows : You can draw 90 degree or 45 degree Butt Weld elbows, as arcs or as two lines. you can also draw socket weld or screwed elbows. Also, you can put a donut to indicate miter-cut. Select the option by clicking elbow. Icons appear on screen showing the type of drawing PROGRAM for PIPING ISOMETRIC DRAWINGS will draw. Select the one required, by double-clicking. For inserting an elbow, select the two pipe lines near the end (osnap end is already set). The elbow is inserted in the junction of two lines. If you are using arc option, a point will be put at the intersection of the two pipe lines, which can be picked as node during dimensioning. In case of miter cut, PROGRAM for PIPING ISOMETRIC DRAWINGS asks to select the pipe line and PROGRAM for PIPING ISOMETRIC DRAWINGS puts a weld at the end of the line. Reducer : You can draw a concentric reducer, eccentric reducer flat side up, eccentric reducer flat side down or swage. Select the option by clicking reducer. Dialogue Box appears on screen showing the type of drawing PROGRAM for PIPING ISOMETRIC DRAWINGS will draw. Select the one required, by double-clicking, and select the point on the pipe line where larger end of reducer will be inserted (osnap nearest is already set), and then a point on pipe towards the side of smaller end of reducer. You are prompted for size of pipe on other side of reducer through a dialogue box. Only valid sizes are available for swage. You are then asked to select a point where text will be written. Program calculates offset distance and writes offset distance on reducer in case of eccentric reducers only. In all cases, PROGRAM for PIPING ISOMETRIC DRAWINGS writes size and type of reducer at the text insertion point. The reducer is inserted in the line. An alert message tells you to erase lines on other side and draw a new pipe lines with proper size. In case you select line angle as 90 degree or 270 degree for eccentric reducer, program ends action alerting that eccentric reducer is not be used in vertical lines. Strainers : This offers 4 options. Y type Strainer with Slip-on Flanges or Y-Strainer with Weld Neck Flanges, Bucket type Strainer with Slip-on Flanges, or Bucket-Strainer with Weld Neck Flanges. Select the pipe line, and the strainer with flanges and gasket is drawn in the line. Sight glass : This offers 4 options. Double Window with Slip-on Flanges or Double Window with Weld Neck Flanges, Full View with Slip-on Flanges, or Full View with Weld Neck Flanges. Select the pipe line, and the sight glass with flanges and gasket is drawn in the line. Couplings : You can draw full and half coupling, with butt-weld or threaded end, hexagonal coupling, victolic coupling and hose coupling. Select the option by clicking coupling. Dialogue Box appears on screen showing the type of drawing PROGRAM for PIPING ISOMETRIC DRAWINGS will draw. Select the one required, by double-clicking and then the pipe line. In first four cases, you are prompted for size of coupling through a dialogue box. You have to then select, through dialog box, the angle of side branch. PROGRAM for PIPING ISOMETRIC DRAWINGS draws coupling and you can continue drawing pipe line. PROGRAM for PIPING ISOMETRIC DRAWINGS writes size near the fitting. In case of hexagonal coupling, select the pipe line, and then size of coupling from the dialog box. The hexagonal coupling is put in the pipe line. PROGRAM for PIPING ISOMETRIC DRAWINGS writes size near the fitting. In case of victolic coupling, select the pipe line and the coupling is put in the pipe line. In case of hose coupling, you are asked for location of insertion and then angle of hose coupling, and PROGRAM for PIPING ISOMETRIC DRAWINGS draws a hose coupling. Union : With this you can draw a union. Select the option by clicking union, and then the pipe line. The union is inserted in the line. You are asked whether union is butt-welded or threaded, to draw the appropriate one. Hose : With this you can draw in-line hose which is like a bellow in a line, or flexible hose. Select the option by clicking hose. Dialogue box appears on screen showing the type of drawing PROGRAM for PIPING ISOMETRIC DRAWINGS will draw. Select the one required, by double-clicking, and then the pipe line for hose and from dialog box, pick-up the angle of in-line hose, or flexible hose. The in-line hose is inserted in the pipe line and flexible hose is inserted at the point selected. Trap : With this we can draw a trap. We select the option by clicking trap and the pipeline. The trap is inserted in the line. BILL OF MATERIAL (BOM): With this we can write BOM and edit Bill of Material. There are thirteen options: Table with Dummy Entries : Program asks for number of entries. Type in the last number of BOM list. PROGRAM for PIPING ISOMETRIC DRAWINGS then asks for pipeline size. Program draws a table with 5 more empty lines. PROGRAM for PIPING ISOMETRIC DRAWINGS writes serial numbers, line size in all rows and ? entry in quantity column. PROGRAM for PIPING ISOMETRIC DRAWINGS writes desc in Description column. These are edited later, using ddedit command. Automatic Bill of Materials : PROGRAM for PIPING ISOMETRIC DRAWINGS searches for number of entities and writes in a table. Only table: You can draw a blank table. A dialog box appears, and asks for number of entries. PROGRAM for PIPING ISOMETRIC DRAWINGS draws a blank table with those many entries. Edit Description : With this option you can change text in description column by selection of piping item. Program asks to select text to modify and then you can choose text from dialogue boxes. Text is written in place of desc. You can change or add description by editing iso10.lsp in notepad. You can edit description of Valves as per class 150# / 300# / 600# / 800# Pipes Fittings: Elbows, tee, reducer, Olets, coupling, union, plug or cap Flanges as per IS or ASME Gasket Nut Bolts When you click on the option program will ask you to select text. You can select multiple texts. A dialog box will open and allow you to select from multiple options. The selected text will be inserted in the place of text from the drawing that was selected. Edit text by Class (spec) : Select proper spec, and then program asks to select text to modify from the BOM table. Pick up text to modify and you can replace text by typing a text or by picking corresponding one in dialog box. You can also use short commands as displayed in command prompt. Stud bolt Size : You can change the size of stud bolt in BOM table in two ways, Diameter in inches and length in mm or diameter in mm and length in mm. Select the standard and class of flanges (ANSI or BS) and proper option. Then select the diameter of flange from dialog box and give number of sets of stud bolts. Program calculates number of bolts required for those many sets and ask to select text to replace the size and then quantity of stud bolts. Nut bolt Size : You can change the size of Machine bolt in BOM table in two ways, Diameter in inches and length in mm or diameter in mm and length in mm. Further select the standard and class of flanges (ANSI or BS) and proper option. Then select the diameter of flange from dialog box and give number of sets of nut bolts. Program calculates number of bolts required for those many sets and ask to select text to replace the size and then quantity of nut bolts. Change Number By : In case there is any change in tag numbers, we can change the numbers from -5 to 5. Oblique Text to : With this we can oblique the text so as to fit its rotation angle. Text Height : We can change text height of the text you select to 2, 2.5 and 3 mm. Move Bill Of Material : We leave a gap of one row after valves, pipes, fittings, flanges, gaskets and stud bolts. It can be done by this option. We select text to move and PROGRAM for PIPING ISOMETRIC DRAWINGS will move it by one column down. Erase BOM / Tags : If we use this option, all the tags and BOM Table with all entries will be erased. DIMENSIONS: Dimensions have got five options. Dimensions for Vertical Lines : With this you can write dimensions, in four inclined directions, for a vertical line. Select the option by clicking menu. Dialogue box appears on screen showing the type of dimension PROGRAM for PIPING ISOMETRIC DRAWINGS will draw. Select the one required, by double-clicking, and the two end-points, or press enter to select the line, and indicate location of dimension text, and enter dimension text. The dimension is written on the line. In case of continued dimension, select last point option at location of dimension. (Just press enter when asked to indicate location of dimension text). Dimensions for Inclined Lines : With this you can write dimensions, for inclined lines. Select the option by clicking menu. Dialogue box appears on screen showing the type of dimension PROGRAM for PIPING ISOMETRIC DRAWINGS will draw. Select the one required, by double-clicking, and the two end-points, or press enter to select the line, and indicate location of dimension text, and enter dimension text. The dimension is written on the line. In case of continued dimension, select last point option at location of dimension. (Just press enter when asked to indicate location of dimension text). Isodim Symbols : With this option you can draw a column reference as well as write texts as (+150), (HOLD), (REF), (TYP) below an existing dimension text. For this we pick-up option from dialogue box and then a dimension text. Text is written below the dimension text. you can also write Cl El with a line from end point of an elbow. Dim Text Height : You can change text height of all the dimensions to 1, 1.5, 2, 2.5 and 3 mm. Gasket Sign : You can put the gasket sign in dimension, using this. Pick-up end point of valve (osnap end already set), and pick-up inclination angle from dialog box. TAGS : With this you can draw spool nos., bubble, instrument tag and tag for gaskets / nut-bolts. Select the option by clicking menu. Dialogue box appears on screen showing the type of drawing PROGRAM for PIPING ISOMETRIC DRAWINGS will draw. Select the one required, by double-clicking. In case of spool no, enter the spool no as text and then pick a point where text should appear. Then select pipeline or fitting (osnap nearest is already set), and then select second point on spool tag to draw a line indicating the spool. HATCH: With this you can draw vertical or horizontal hatch patterns in 5 different ways by selecting three pipe lines. In first 2 cases you can do horizontal hatching in 2 different ways. With third you can do vertical hatching. When you select a pipe line, program asks for dimension of this pipe line. Hatch repears for other two pipe lines. hatch then runs zoom window command and ask you to select window to zoom the area where to write angle. After you write angle, drawing will zoom to previous view. WELD: With this you can draw welds or ends. Six options are available. Butt-weld included in this drawing option will draw filled donut, Butt-weld not included in this drawing option will draw hollow circle. Other options will draw socket-weld end, screwed end, field weld, field fit weld. Select the option by clicking weld option. Dialogue Box appears on screen showing the type of welds / ends program will draw. Select the one required, by double-clicking. Then select pipeline (osnap nearest is already set), where a weld or end is drawn instantly.


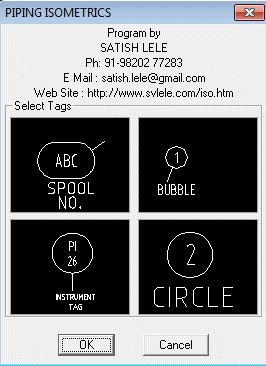
In case of bubble, select pipeline or fitting (osnap nearest is already set), and then select second point where the tag no will be written. A tag no is displayed. You can accept the same number by pressing enter or type a new number and press enter.
In case of instrument no., select instrument valve, or fitting (osnap nearest is already set), and then select second point where the tag no will be written. Fill in dialog box text for fitting type and number. Fitting tag appears.
In case of circle, select the earlier circle at the top point (osnap nearest is already set), A tag no will be displayed. You can accept same number by pressing enter or type a new number.
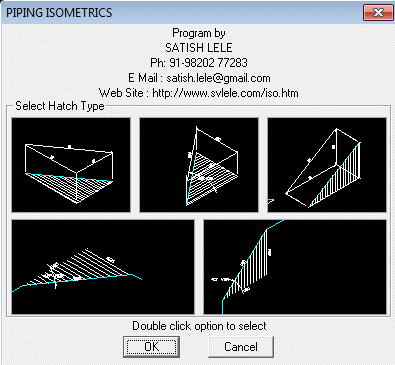
With fourth and fifth option, you can draw vertical or horizontal hatch patterns by selecting three pipe lines. After you select each pipe line, program asks for the length to be written as text. After hatch is drawn, program writes length of the three lines. Program then runs zoom window command and ask to select window to zoom the area where to write angle. After you write angle, program will zoom to previous view.
My programs run well in in these inexpensive CAD Programs. Download Trial Programs of either BricksCAD Lite or ProgeCAD or IntelliCAD or Draftsight or CADLogic or ZWCAD or FreeCAD, to check usefulness of my packages.  to Download Piping Isometrics Package. Package can also run well in AutoCAD, upto AutoCAD 2010 but can not run on AutoCAD LT. to Download Piping Isometrics Package. Package can also run well in AutoCAD, upto AutoCAD 2010 but can not run on AutoCAD LT.
|
to Download Loading Instructions for Piping Isometrics Package. to Download Catalog for ASME Piping Isometrics Package. to Download Catalog for ASME, Triclover and Victaulic Piping Isometrics Package. Cross Country Piping Cross Country Piping |
 |
ATV Isometric Program |